

How To Draw A Galaxy Photoshop
How to start making pixel fine art #1
An absolute beginner's guide
This is a little article on how to commencement making pixel art, intended for those who are really starting out or never even opened a pixel art software. For at present I'll cover but the very basics, how to create a file, setup the sail size, and work with a color limit.
This article was supported by Patreon! If you like what I'm doing here, please consider supporting me in that location :)
Also, this is the role 1 of a series of articles, read the whole series here in the Pixel Grimoire.
Before Starting
Before jumping into pixel art, recall: pixel art is but another fine art medium, like guache, oil painting, pencil, sculpture or its close cousin mosaic. To make good pixel art you demand to exist able to make good drawings. In general, this means studying beefcake, perspective, low-cal and shadow, color theory and even fine art history, as these are all essential for making proficient pixel art.
Tools
You don't need anything fancy to make good pixel art, and you can practice fine even with just a skillful mouse and gratuitous software. My setup includes a small Wacom pen tablet, a adept mouse, a skilful keyboard and my favorite software is Aseprite, but you should use any your're most comfortable with.
Here's a list of software normally used for pixel art:
- Aseprite : Peachy professional editor with many time-saving features (paid)
- GraphicsGale : A archetype, used in many games. Information technology's a footling complex, simply total of great features (free)
- Piskel : Complimentary online pixel art editor (gratuitous)
- Photoshop : Powerful prototype editor non intended to make pixel fine art but you lot can set information technology up to use it (paid)
Aseprite
Aseprite is my favorite pixel art software right now. Information technology's incredibly powerful, packed with features and nonetheless simple to apply. I chose Aseprite as the software for this tutorial but I'one thousand pretty sure you can adapt it to whatever other software you use with minimum changes. You can also get the free trial for Aseprite, but keep in mind information technology won't save your files, which I gauge it's OK if yous are merely practicing.
Making a New File
Just click the "New File…" link in the home screen or go to File > New File so nosotros can commencement drawing.
Let's create a new file. sixteen past 16 probably seems a picayune besides small, but I call up it's a adept starting bespeak. Bigger resolutions can distract you from what you should focus at present: understanding the interactions of pixels with their neighbors.

You can leave the color manner in RGBA, that is the most simple and intuitive for now. Some pixel artists like to work with an indexed palette which allows some pretty cool color tricks, merely comes with some drawbacks as well.
Proceed the background transparent or white, information technology won't change much for at present. Simply make sure that Advanced Options is unchecked (but feel free to experiment with them after) and you are good to go!
Permit's Draw!
There are lots of toolbars and menus there, but don't worry, we but need a few buttons for now. The main tool is the Pencil, that should always be kept with 1 pixel of width, and it will be how we place our pixels on the canvas. Just click the push button, or press B, and click on the screen to place down a pixel of the selected color.
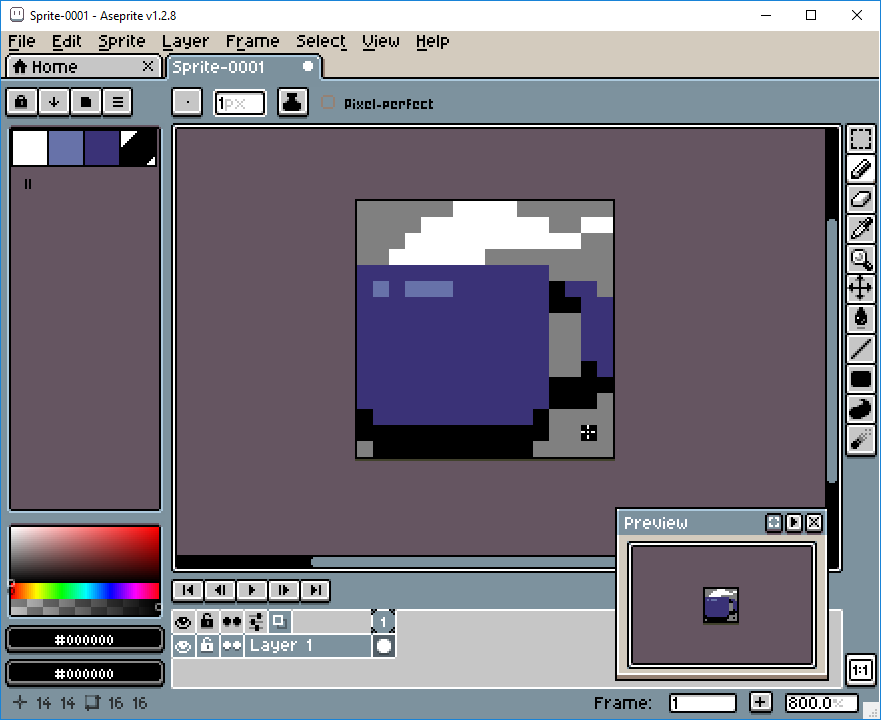
On the left y'all can see your color palette, with some of the default colors. Let'due south change those to another, simpler prepare. Click on the third icon on elevation of the colour palette (Pressets) and choose ARQ4 (a actually good palette fabricated by Endesga), that's the one yous will be using for your starting time sprite.
At present, only using the iv colors on the acme left, try drawing a mug.
Feel gratuitous to use mine as an inspiration, only also try making information technology unique. If you make a mistake, alt+click on an empty expanse or outside of your drawing and you volition "pick" the transparent colour and you lot can use it to erase pixels. Alternatively y'all can click on the Eraser or press Due east to select information technology.
You will probably notice that working in such a low resolution is very different from regular cartoon. Everything needs to exist calculated, and each pixel you identify is a big pick you lot need to make. That'due south the thing you lot will need to get used to.
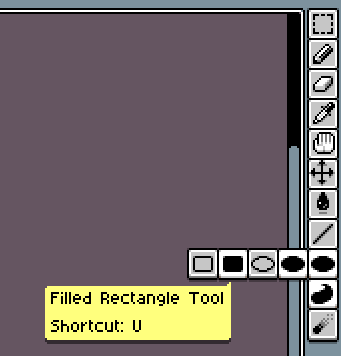
Y'all tin can also experiment with the other buttons in the toolbar. It'due south worth noticing that some buttons will open more options when pressed. Only avoid the blur tool for now, as it adds more colors and we don't want that nonetheless.
Next, let's make more sprites! Endeavor drawing a skull, a sword and a man face. This time without my pixel art reference. If yous feel that the sprites just won't fit in the canvas, that's absolutely normal, attempt abstracting something to a unmarried pixel and try over again. It's very hard to work with such a low resolution and it feels like a puzzle sometimes. Here's another article I wrote about working with low resolutions for Kano: [link]
If you want, here's my versions of those sprites, simply please make sure to end yours before looking at them [skull, sword and human being face].
This is always a good practise. If you want to keep practicing, endeavour making even more drawings with those constrains.
Saving Your File
To save your file printing Control+Southward (or go to File>Save As…), choose a file name and location and just hit save.
Don't forget that in the trial version of Aseprite saving is disabled!
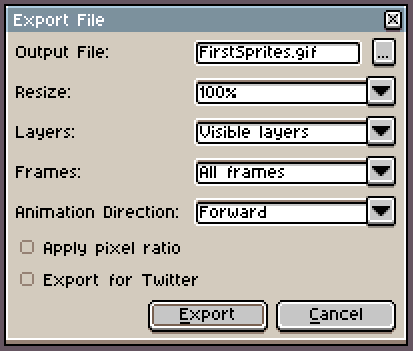
Y'all will see that Aseprite can save in a variety of formats, only I e'er recommend keeping a .ase version of every file you make. Just like in Photoshop y'all would go along a .psd file. When exporting for spider web or games, y'all tin use Control+Alt+Shif+Due south or File>Consign.
Aseprite has this really proficient Resize feature in the export window. Information technology just scales your sprite in circular numbers, which is perfect. If you rescale your sprite 107%, for example, information technology volition break pixels everywhere and information technology will exist a mess, only if you calibration information technology 200% each pixel will now be 2 pixels wide and tall, so it will look nice and sharp.
A Bigger Sheet
Now that you got the basics, like creating a new file, saving and drawing into the sail, let'due south try drawing on a slightly bigger canvas, 32 past 32 pixels. We'll likewise use a bigger palette at present, try the AAP-Micro12 (by AdigunPolack). This time nosotros volition describe a shovel.
Unlike the 16 by 16 sprite, we tin actually fit some outlines hither, so let'south start with that. Here's my process breakdown:
Step i: Lines

This line style is what nosotros telephone call a pixel perfect line, it's only 1 pixel wide and information technology connects diagonally with other pixels. When making lines like that we avert unintentional edges, like here:
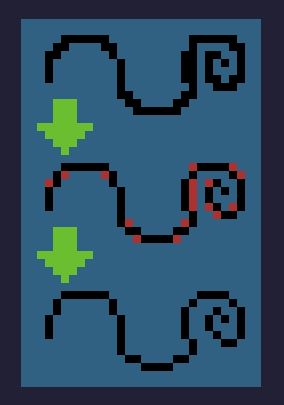
Aseprite too has a really practiced characteristic on the brush settings to do that almost automatically: with your castor tool selected, click the Pixel-perfect checkbox. Just don't forget to toggle it off when not working with outlines because it will probably annoy you.

Step ii: Base of operations colors

The good thing virtually having simply and so few colors to choose from is that you won't be overwhelmed by too many options. That's why it's much harder to work with a lot of colors, if you have a color in your palette there's no excuse not to utilise information technology at it'south best. Try to call up of it as a puzzle, experiment a lot, even weird or unusual combinations until you find what you believe is the "best lucifer" for each area.
Step 3: Shading

Utilize your palette to make lite and shadow in creative means. Since yous are working with a very restricted palette, you won't accept every hue with different brightness, so you will have to improvise.
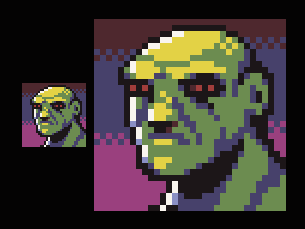
In the example on the left I'm using the same palette you are, the AAP-Mini12. When I drew this green dude I didn't have any light green color, so I went with the nearest hue I had bachelor, which was yellow. The same thing happened with the shadow, I chose blue because it was the closest dark one. But what if I went the other manner? I could get a brighter blueish and darker red, correct? Well, not really:

It'due south a cool outcome, merely conspicuously there'south something wrong. Usually you will want the common cold hues to be your shadows and warm hues to exist your key light, or they might wait weird. This is not a stone-written-rule or annihilation, in that location are many exceptions, but when not sure, only go with it.
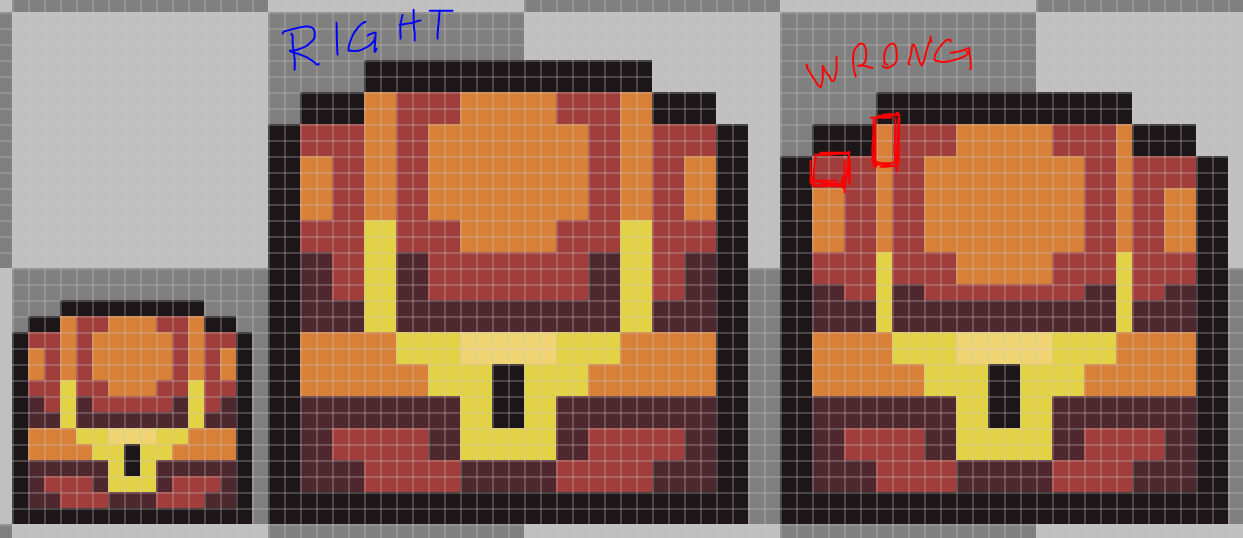
Stride 4: Anti-alias and polish

This is the role of the drawing where you endeavour to make the pixels a niggling less "pointy". Manual anti alias is a complex subject, and nosotros probably will need a whole article to discuss only that, but the theory is, you will use mid tones to simulate "half pixels" and soften the edges. Simply don't worry too much almost this yet, for now focus on making your sprite as readable as possible.
Some other skillful idea in this step is to hunt down some orphan pixels to reduce noise. Orphan pixels are pixels that are not part of a bigger group of pixels of the same color and are non part of the anti-allonym, similar this:
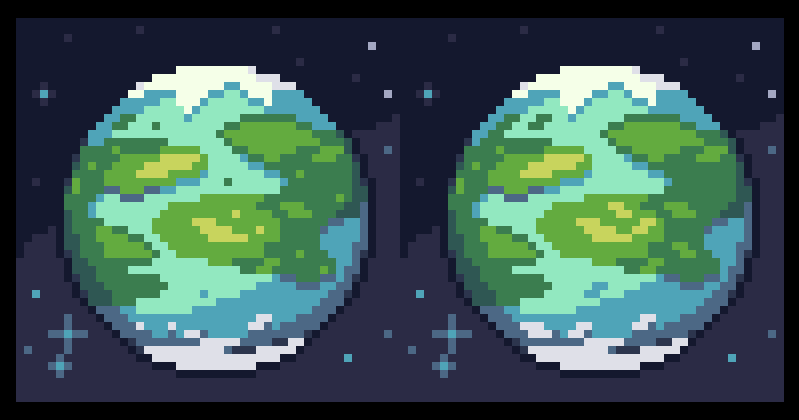
You run into the trivial 1-pixel-islands on the left? Those are orphan pixels, as you can run across the planet looks much amend after nosotros merge those pixels with some other nearby pixels of the same colour.
And what near the stars in that example? Well, they are at that place to prove that orphan pixels are not always bad, those stars work exactly as intended, creating a noise texture and bringing up the dissimilarity in the background.
The idea is not to mindlessly remove orphan pixels, simply to through them and ask yourself: does this pixel really need to be lonely?
Now What?
At present it's time for you to experiment with more colors and bigger resolutions! Only become slowly, perchance 48 by 48 and xvi colors and and so on. If y'all are really starting out I would avoid animation for at present and focus on getting comfortable with static images beginning.
I selected another pixel art guides that I really like if you want to do some research:
- Pixel fine art tutorial past Cure
- Pixel fine art tutorial by Derek Yu
- Pixel art tutorial by Arne
I too brand some tutorials about specific topics or aspects of pixel art and game design, you can run into them all here:
- My Patreon page
- A compiled listing of all my tutorials
Go along reading the part ii here !

Source: https://medium.com/pixel-grimoire/how-to-start-making-pixel-art-2d1e31a5ceab
Posted by: whitakertecame.blogspot.com
0 Response to "How To Draw A Galaxy Photoshop"
Post a Comment